Integrations and Automations – Creating an Automation
With automations, you can seamlessly connect your Mentortools platform with external tools like ActiveCampaign, Mailchimp, or HubSpot. This guide will walk you through setting up and activating a new automation step-by-step.
Last updated 9 months ago
Mentortools allows you to connect directly to email providers. For example, if you work with tags, you can also store specific tags from your email tool in your member area. This lets your email program's funnel know when to trigger.
To create a connection, follow these steps.
Click on "Settings," then "Integrations & Automations."

Automations
Once you've established a connection to an external provider, you can set up the events you want in the "Automations" section.
Click on "Add Automation."

How to create a New Automation?
Trigger – The event that triggers your action
When creating an automation, you can distinguish between internal and external actions.
Internal are all actions that take place in your member area. External are all actions that happen outside of it.
We'll select "Internal," as the user actions take place in your member area.

Trigger Type
Next, select which trigger must be activated to start the automation.
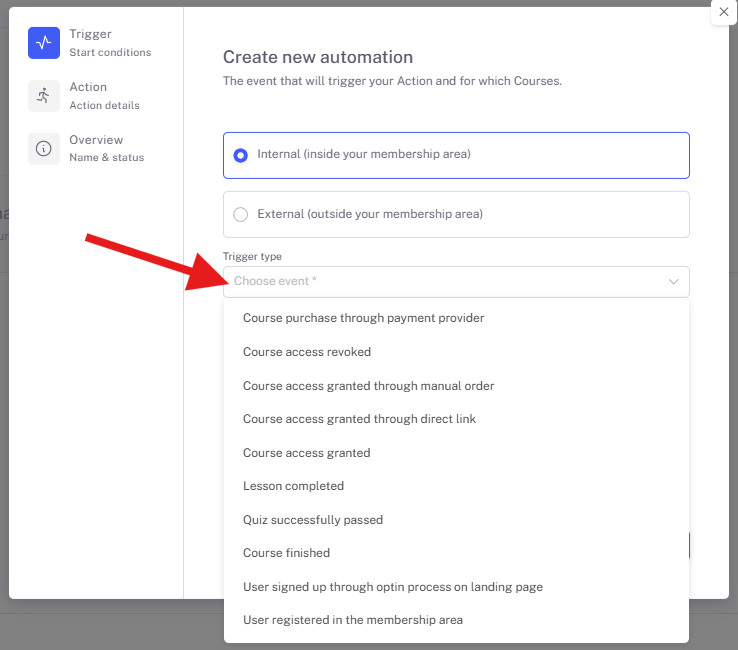
Course Purchase via Payment Provider Select "Course Purchase via Payment Provider" if users enter the member area through a payment process.
Course Access Revoked Select "Course Access Revoked" if the course users (buyers) have canceled or revoked access to the online course.
Course Access is Granted via Manual Order Select "Course Access is Granted via Manual Order" if you, as an admin, have manually invited a user yourself. For example, through a manual order: https://support.mentortools.com/en/articles/5731361-add-manual-order
Course Access is via Direct Link Select "Course Access is via Direct Link" if users enter your member area via a direct link to a course. You can find the course's direct link under "Course Settings," then the "Access" sub-item.
Course Access Granted Select "Course Access Granted" if users already have access to your member area but have started an additional free course.
IMPORTANT: You can create multiple automations for each contact or tag transfer. Additionally, a contact transfer must ALWAYS happen first before the tag can be forwarded.
Setting Up the Automation Action
First, select the system – where the contact or tag should be transferred.
Choose whether the contact or the tag is transferred. Depending on the provider, you may only work with contacts since some email providers use lists.
Then, click on "Continue."

Overview
Give the automation a name and activate it. Afterward, click on "Save and close."

You have now successfully created a connection to your email provider. Each time the trigger is activated, the tag or contact will be forwarded to your email marketing software.
Good luck!