Opt-in Processes – Overview
With an opt-in process, you can legally collect email addresses via landing pages. For you to be allowed to send automated emails to your contacts, they must confirm their email address after signing up.
Last updated 10 months ago
For this, you need an opt-in process—also called a sign-up process. The process defines the sequence of events after a sign-up. It defines which confirmation email a user receives.
What Is an Opt-in Process?
An opt-in process is a predefined sequence that starts as soon as someone signs up via a landing page—be it for a freebie, a webinar, or a challenge.
The process can include the following steps:
Sending a confirmation email that serves for double opt-in confirmation.
Automatic redirection to a thank you or sales page.
After the opt-in process is completed, the participant's email address can be further processed in the automation settings under "Integrations and Automations." This is where integration with external systems takes place to trigger further automated actions.
Where Can I Find Opt-in Processes in Mentortools?
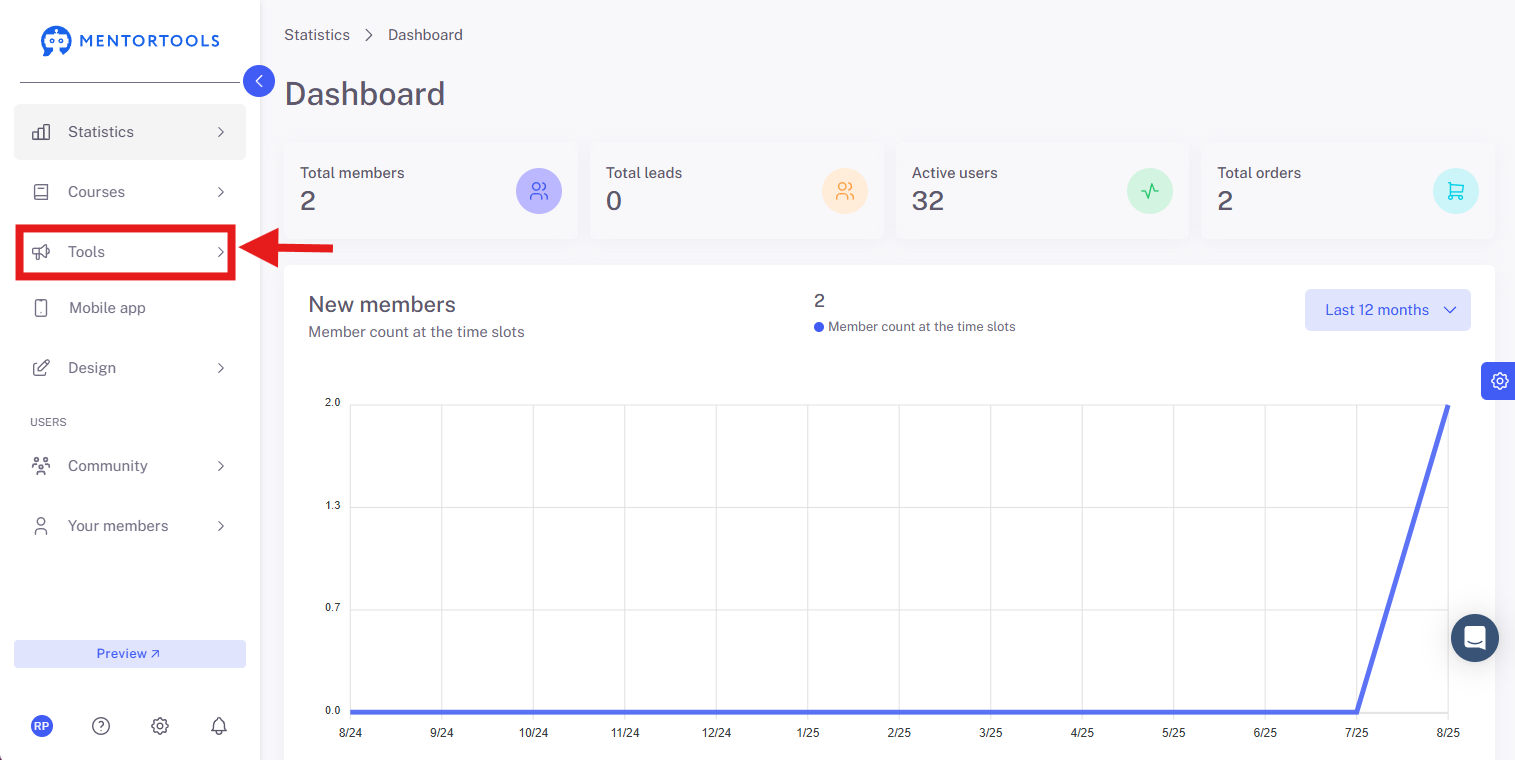
1. Navigate to the "Tools" Section
Go to "Tools" in your Mentortools dashboard.

2. Select "Opt-in Processes"
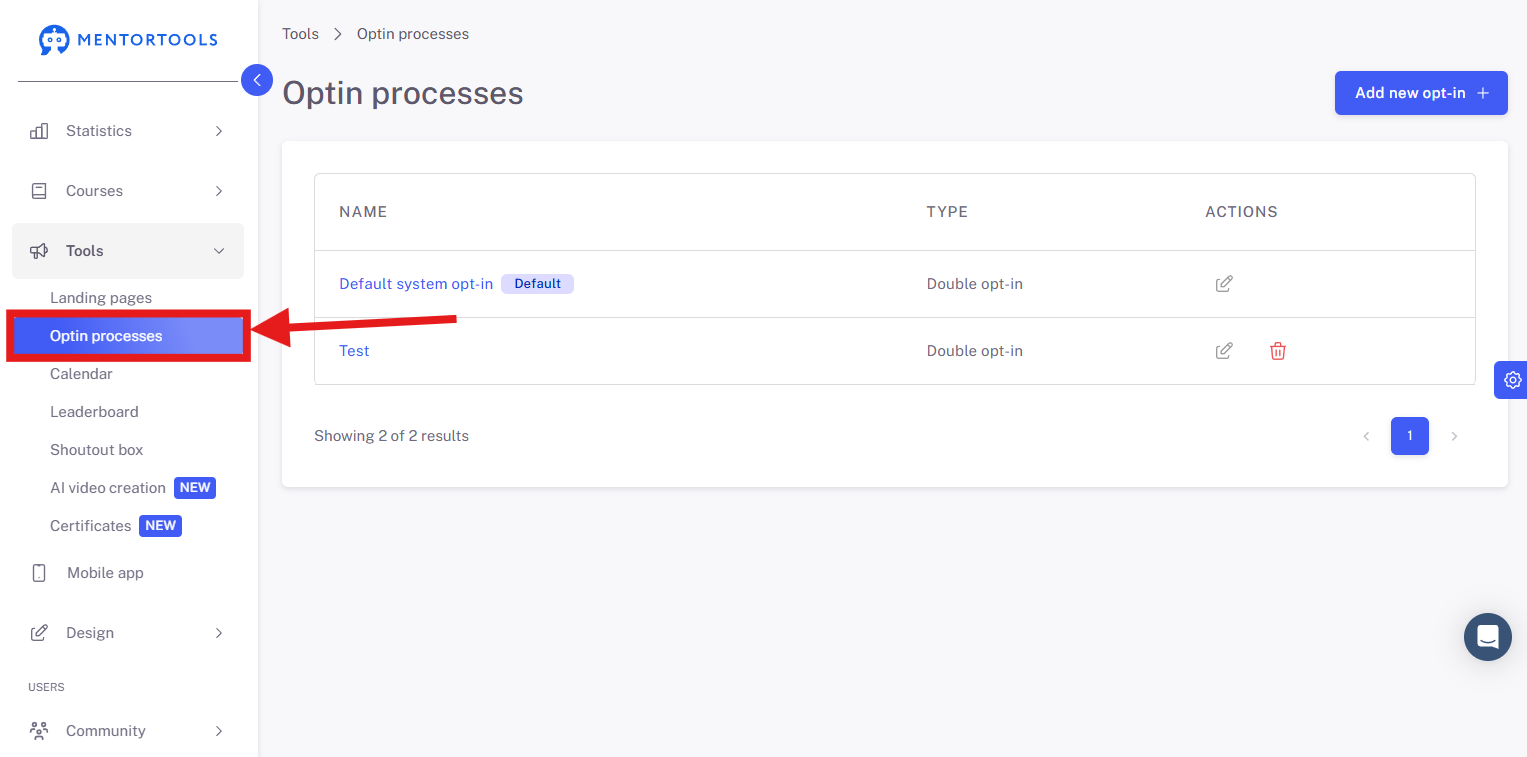
There you will see an overview of all created processes—including the name and type (Single/Double Opt-in).

Difference Between Single and Double Opt-in
Tip for Your Marketing Funnel
Create a separate opt-in process for each campaign (e.g., freebie, webinar, newsletter). This allows you to specifically:
Customize automated emails
Tag participants differently
Use different redirections
Test and optimize processes
A clear structure in the opt-in area saves time, minimizes errors, and increases the conversion rate.
Guide: Editing a Standard Opt-in Process
1. Open the "Tools" Section
2. Click on "Opt-in Processes"

3. Select the opt-in process to be edited

4. Overview of Common Settings
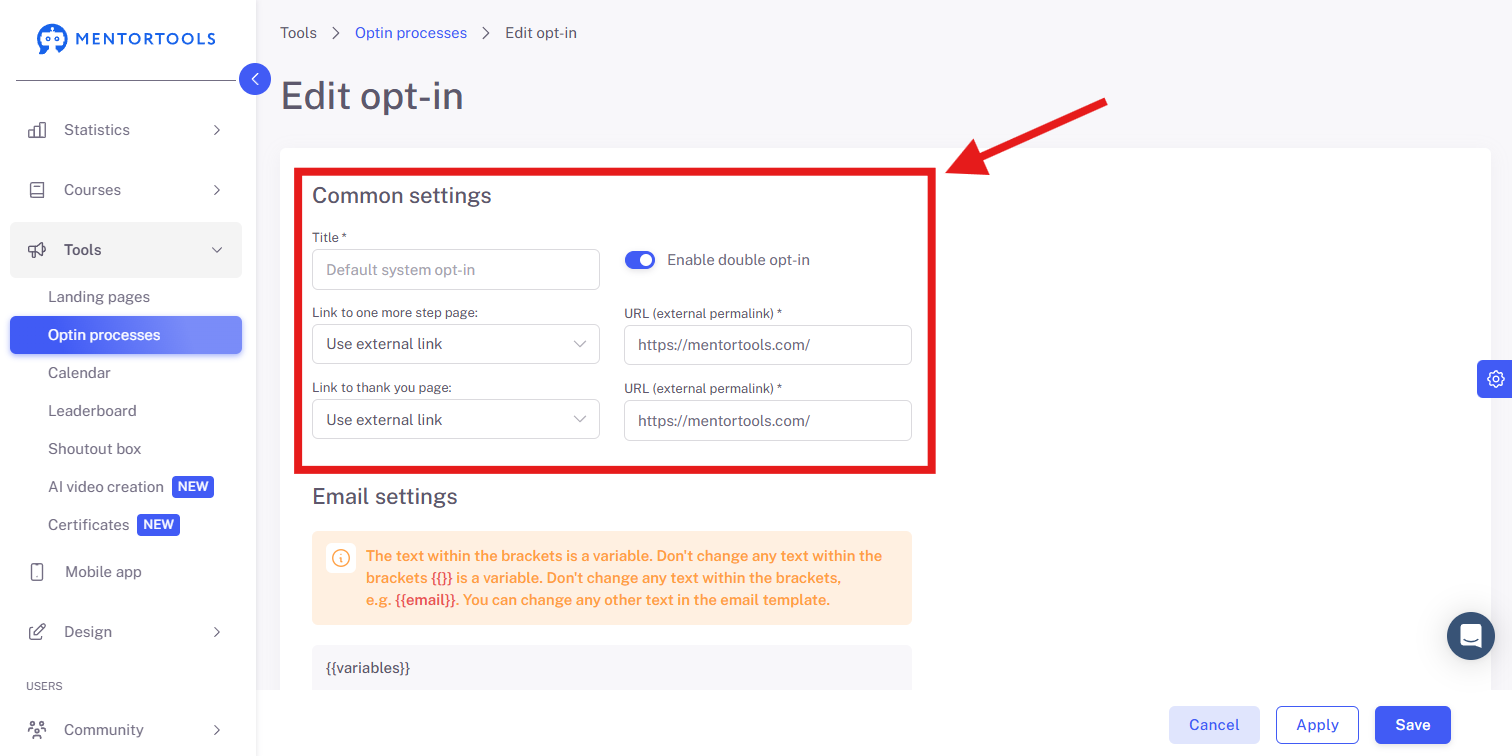
This image shows the "Common Settings" for an opt-in process. Here is an explanation of the individual fields:
Title
Field: Default System Opt-in
Purpose: This is the internal name for this specific opt-in process. It serves for organization and identification in the platform's user interface. Users do not see this title.
Activate Double Opt-In
Switch: Enabled or disabled
Purpose: If this switch is enabled, the user must confirm their email address after the initial sign-up. They receive an email with a confirmation link that they must click to complete the sign-up process. This is an important legal requirement in many countries (e.g., in the EU due to GDPR) to ensure that the person signing up is the actual owner of the email address and consents to receiving messages.
Link to a one more step page:
Dropdown Menu: "Use external link" is selected.
Purpose: This determines what happens after the initial sign-up (after the user has entered their email address, but before the double opt-in confirmation). The "Use external link" option means that the user is redirected to an external URL. This could be a page that tells them to check their email inbox.
URL (external permalink):
Field: https://mentortools.com/
Purpose: Here you enter the URL of the page to which the user is redirected. In the example, it is the homepage of mentortools.com, but it should often be a specific page that informs the user about the next step (email confirmation).
Link to a thank you page:
Dropdown Menu: "Use external link" is selected.
Purpose: This determines what happens after the successful completion of the opt-in process—i.e., after the user has confirmed their email address (in the case of a double opt-in).
URL (external permalink):
Field: https://mentortools.com/
Purpose: Here you enter the URL of the thank you page. This page is shown to the user to thank them for signing up. You could also grant them direct access to the course or offer additional information here.
Use external link / New landing page (New)

The two dropdown menus, "Link to a one more step page" and "Link to a thank you page," are super important. They determine where your user is sent after they have performed a specific action. For example, when they enter their email address or when they confirm it via double opt-in.
You always have two main options:
Use external link: If you choose this option, you redirect the user to any website outside your platform. This could be your own website, a blog article, or even another landing page. You simply enter the URL in the field next to it.
New landing page (New): Here you can select a landing page that you created and published directly on this platform. The name "New landing page (New)" is just an example of what such a page could be called. All published landing pages are displayed here. This is usually the better choice because it keeps the user within your system and ensures the entire user experience is seamless.
In short: You decide whether the user is redirected to a page outside the platform or to one you built inside it. For an internal page to appear in the list at all, you must, of course, first create and publish it.
5. Email Settings for the Activation Email

These settings belong to the email that the user receives as part of the double opt-in process. Here is an explanation of the fields:
Email Settings
Here you can customize the email that is sent for activation. At the top, you see an important warning: Do not change any of the texts in the curly brackets {{...}}, as these are variables. They are automatically replaced with the correct information.
Variables These are placeholders that the system fills with real data. You can think of them as personalizing your email.
{{content_creator.first_name}} and {{content_creator.last_name}}: Your own first and last name. This makes the email appear as if it's coming directly from you.
{{content_creator.page_url}}: Your personal Mentortools link.
{{lead.first_name}}, {{lead.last_name}}, and {{lead.email}}: The first name, last name, and email address of the user who signed up.
Subject of the Email Activation
Field: "One more click..."
Purpose: This is the email's subject line. The text should be formulated to make the user curious and open the email. It should also be clear that it's about a confirmation so it doesn't end up in the spam folder. "One more click..." is a good example because it's short and concise.
Content of the Activation Email
Purpose: This is the actual text of the email that the user receives.
Editor: Here you can format the content, similar to a word processor. You can make text bold or italic, create lists, and insert links.
Most Important Part: The link {{activate_page_url}}. This must be included in the email. When the user clicks this link, they confirm their email address, and the sign-up process is completed. Without this link, the double opt-in process will not work.
The rest of the text briefly explains to the user why they should click the link and what happens next (e.g., receiving a gift). At the end, you see how the variables for your own name data are used to make the email more personal.
6. Email Settings for the Thank You Email

Here you see the settings for the second email that is sent to the user—the thank you email. It is sent automatically as soon as the user has confirmed their email address, i.e., after clicking the link in the first email.
The rule here is also the same: Do not touch the variables in the curly brackets {{...}}! The system replaces them automatically with the appropriate data.
Subject of the Thank You Email
Field: "Here is your download link"
Purpose: This is the subject of the thank you email. It should directly reveal what the user will find in the email. "Here is your download link" is a great example because it meets the user's expectations, as they signed up for a gift.
Content of the Thank You Email
Purpose: This is the text the user receives after successful confirmation.
Editor: You can customize the text here as you wish. It is important to greet the user and thank them for signing up.
Important Part: This is where the link to the promised gift belongs (e.g., a download link or the link to the course). In the example, it says "Insert link here," which you must, of course, replace with the real link. Without this link, the user will not get their gift, and the whole process makes no sense.
7. Send Test Email (Optional)
Send to email
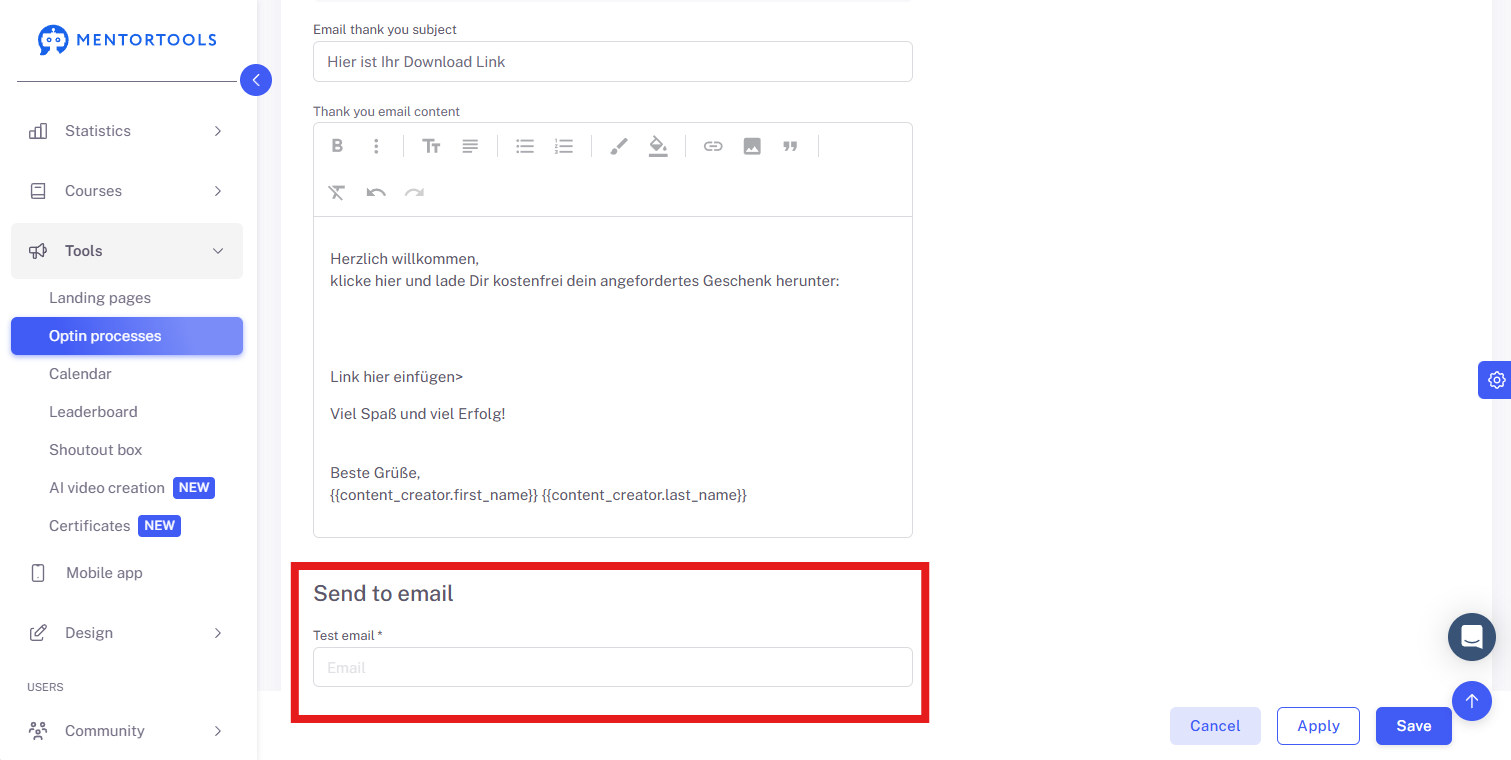
Field: Test Email
Purpose: This field is only for testing the email template. You can enter your own email address here and click the "Send test email" button. This allows you to see exactly what the finished email looks like and whether everything is working correctly before it is sent to your users. This is very practical for avoiding errors.
IMPORTANT: Make sure you use an email address that you have not previously used in your account for testing. If an email address has already been set up as a double opt-in, the opt-in process will be simplified and displayed as a single opt-in.
8. Save Changes

Summary
With this guide, you have learned the most important basics of the opt-in process in Mentortools. You now know the difference between single and double opt-in and how to use the whole thing for your marketing. You have also seen how to implement the individual steps directly on the platform. This not only creates a clear structure but also ensures legally compliant and effective communication with your prospects and participants.